NaviGo POI Editor User Guide
Copyright © 2007-2012 Telogis, Inc. All rights reserved.
| Revision History | ||
|---|---|---|
| Revision 1.10 | Document generated on: Wed Jun 3 14:16:45 EDT 2015 | |
Legal Notice-Terms of Your Use of this Document
There should be a written contract between Telogis, Inc. ("Telogis") and the company by which you are employed (hereinafter, "Company") that governs you and your Company's use of this Confidential/Proprietary Telogis document. In the unlikely event such contract does not exist or has expired, then the use of this document, including the information contained therein, by you, not only individually, but also as an employee and on behalf of your Company, is subject to the CONFIDENTIALITY AND NONDISCLOSURE provisions below. IF YOU OR YOUR COMPANY DOES NOT AGREE WITH THESE PROVISIONS, YOU AND YOUR COMPANY MUST IMMEDIATELY CEASE USING THIS DOCUMENT AND DESTROY IT.
CONFIDENTIALITY AND NONDISCLOSURE PROVISIONS
This document, including the information contained therein, constitutes the valuable confidential and proprietary information and property (hereinafter, "Confidential Information") of Telogis or its suppliers. Your use of this Confidential Information is subject to the following terms and conditions:
1. Non-Disclosure and Non-Use. Except as otherwise hereafter expressly permitted or consented to in writing by Telogis, you agree (i) to keep this Confidential Information strictly confidential, (ii) to use such Confidential Information solely in connection with an authorized use or evaluation of Telogis's services (hereinafter, "Purpose"), (iii) not to disclose such Confidential Information to any person or entity (except for the Company's employees, agents and contractors who have a bona fide need to know for the Purpose, are under a duty of non-disclosure with respect to such information and are acting for the sole benefit of the Company (collectively, "Representatives"), (iv) to protect such Confidential Information by using the highest degree of care to prevent the loss, theft or unauthorized dissemination or publication of such Confidential Information, (v) not to use the Confidential Information for you or your Company's product development or incorporate any such Confidential Information in any device, method, product, service or patent, or to use it to compete with Telogis, directly or indirectly or, except for the Purpose stated above, for you, your Company's or any third party's benefit at any time and (vi) not to copy, scrape, disassemble, modify, create derivative works of, translate, reverse engineer, store in a retrieval system, decompile or attempt to obtain the source code for, or any other information from or about, or create derivative works based on, the Confidential Information. You agree that such Confidential Information is and shall remain the proprietary and confidential information and property of Telogis and/or its suppliers. You agree to notify Telogis immediately upon discovery of any unauthorized use or disclosure of Confidential Information or any other breach of these provisions and will cooperate in every reasonable way to help Telogis regain possession of the Confidential Information and prevent its further unauthorized use or disclosure. Notwithstanding the above, you may disclose this Confidential Information to the extent that disclosure is required to be disclosed by law; provided that you use all reasonable efforts to provide Telogis with at least ten (10) days' prior written notice of such disclosure, you disclose only that portion of the Confidential Information that is legally required to be furnished, and you reasonably cooperate with Telogis in its efforts to obtain a protective order or other assurances from the applicable judicial or governmental entity that it will afford the Confidential Information confidential treatment. You further agree not to remove, alter, cover or distort any trademark, trade name, copyright or other proprietary rights notices, legends, symbols or labels appearing on or in this Confidential Information.
2. Return of Confidential Information. At Telogis's request, you shall cease use of this Confidential Information and shall deliver to Telogis all documents and other media (and all copies and reproductions of any of the foregoing) in your possession or control to the extent same contain the Confidential Information. Upon Telogis's request, you shall also certify in writing that all materials containing this Confidential Information have been either returned to Telogis or, if requested by Telogis, destroyed.
3. Disclaimer. TELOGIS PROVIDES THIS CONFIDENTIAL INFORMATION SOLELY ON AN "AS-IS" BASIS, WITHOUT ANY WARRANTIES OF ANY KIND, EXPRESS OR IMPLIED, INCLUDING WITHOUT LIMITATION ANY IMPLIED WARRANTY OR MECHANTABILITY OR FITNESS FOR PARTICULAR PURPOSE or duty to update or correct.
4. LIMITATION ON LIABILITY. In no event will Telogis be liable for any lost profits, data, software or information of any kind, for errors contained in this document or for any direct, consequential, special, indirect, incidental, punitive, exemplary or other damages that may arise through your or your Company's use of this Confidential Information, or pre-release, evaluation or beta test products or services supplied by Telogis. Telogis may make changes in the specifications/information contained in this document at any time without prior notice.
5. No License . All Confidential Information shall remain the sole property of Telogis. No license of any trademark, patent, copyright or any other intellectual property right of Telogis is either granted or implied by its disclosure of this Confidential Information to you.
6. Governing Law. This agreement shall be governed by the laws of the State of California without regard to any conflict of law provisions, and you consent to the exclusive jurisdiction of the courts of Orange County California in any action or proceeding instituted in connection with your use of this Confidential Information.
7. Miscellaneous Provisions. These provisions constitute the entire, exclusive, complete, and final agreement and understanding between you and Telogis relating to this Confidential Information. These provisions may not be amended unless it is in writing and signed by a an authorized officer of Telogis. If any of the above provisions are held invalid or unenforceable for any reason, such invalidity or unenforceability only shall attach to such provision and shall not affect or invalidate any other provision. Use of the Telogis services mentioned in this document is subject to Telogis's Terms of Use, a current version of which can be found at http://www.telogis.com/privacy-policy
Overview
POI Editor is a NaviGo Portal application that allows you to manage points of interest (POIs). You can create new POIs, search for POIs, edit existing POIs (including the geocode data), delete POIs, import batches of POIs, and export POI data.
POI Editor looks like this:
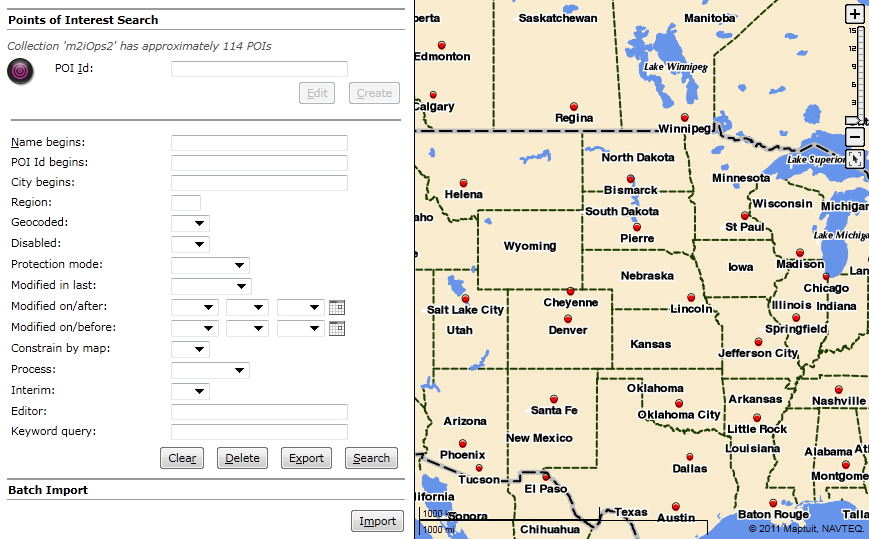
The main POI Editor screen provides direct access to many of POI Editor features, such as searching, deleting, and importing/exporting POIs. The main screen also provides you with an approximate number of POIs contained in the POI collection. The POI collections are indexed on a nightly basis. Therefore, this number is an approximation and may be slightly different than the actual number of POIs in the collection.
Browser Support and Compatibility
POI Editor is tested and supported on the following browsers:
Internet Explorer 6
Note: Newer Maptuit features may not display properly on IE6.
Internet Explorer 7
Internet Explorer 8
Internet Explorer 9
Note: Any versions of Internet Explorer with Compatibility View enabled are not supported.
Firefox 3, 4, 8
Note: Other browsers and versions may work but are untested.
Searching for POIs
Before you can perform operations on POIs (edit, geocode, delete, etc.), you must first locate the POI using the search tool on the main POI Editor screen:
To quickly search for all POIs, simply click the Search button.
| Warning |
Searching the entire collection can take a long time depending on the size of the POI collection. |
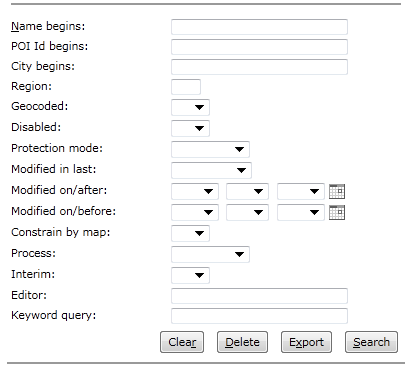
To narrow down your search results to a subset of POIs, you can use a variety of search filters. Simply enter information into the search filter fields and then click the Search button. You can click the Clear button at any time to clear all search filter fields.
Table 1. POI Search Filters
| Filter Name | Description | Acceptable Values |
|---|---|---|
Name begins | If specified, this search filter limits search results to POIs that have a Name beginning with the specified text. | This value can be set to a String. |
POI Id begins | If specified, this search filter limits search results to POIs that have an ID beginning with the specified text. | This value can be set to a String. |
City begins | If specified, this search filter limits search results to POIs that are located in a City name beginning with the specified text. | This value can be set to a string that is a city prefix (e.g. Washing). |
Region | If specified, this search filter limits search results to POIs located in the specified Region. | This value can be set to a String that is a valid region code (e.g. DC). |
Geocoded | If specified, this search filter limits search results to POIs that have the specified Geocode Status. | This search filter can be set to yes to return POIs that have been geocoded, or set to no to returns POIs that have not been geocoded. |
Disabled | If specified, this search filter limits search results to POIs that have the specified Disabled Status. | This search filter can be set to yes to return POIs that are disabled, or set to no to return POIs that have not been disabled. |
Protection mode | If specified, this search filter limits search results to POIs that have the specified Protection Mode. |
This filter can be set to one of the following values:
|
Modified in last | If specified, this search filter limits search results to POIs that have been modified within the specified time period. | Select a time period (e.g. |
Modified on/after | If specified, this search filter limits search results to POIs that have been modified on or after the specified date. | Choose a date using the calendar tool. |
Modified on/before | If specified, this search filter limits search results to POIs that have been modified on or before the specified date. | Choose a date using the calendar tool. |
Constrain by map | Defines whether or not to limit search results to POIs that are located in the current map extent (i.e. the map that is currently displayed on the screen). | This search filter can be set to yes to constrain the search to the map extent, or set to no to include POIs in all locations. The default value is no. |
Process | If specified, this search filter limits search results to POIs that were last modified via the specified process. |
This filter can be set to one of the following values:
|
Interim | If specified, this search filter limits search results to POIs that have the specified Interim status. POIs with an Interim status are generally those locations that have been flagged and should be revisited when data improves in the area. For example, the Interim status POIs will often be geocoded to an incorrect point because the actual location is not in the road network data. | This search filter can be set to yes to only include interim POIs in the search results. This filter can be set to no to only return POIs that have an interim status set to no. |
Editor | If specified, this search filter limits search results to POIs that were last edited by a person with a username beginning with the specified text. | This value can be set to a string. |
Keyword query | If specified, this search filter limits search results to POIs that contain the specified keyword.
| This value can be set to a String. |
Search Results
When the search is complete, POI Editor displays the POIs that match your search criteria. Here is an example of POI Search results.

Your search results will display on the screen, with the first page of results displaying by default. If your search results include multiple pages, you can view different pages by clicking the page links or by entering a page number and clicking the Jump button to jump directly to that page. Sometimes your results will contain too many POIs to locate the one you are looking for. Try clicking the New Search button and using additional search parameters to narrow down your search results.
While viewing the search results, you can perform operations (e.g. edit, delete, geocode) on a POI by clicking the POI ID link.
Example 1. POI Search
Let's search for all POIs that have names beginning with the characters CN.
Simply set the Name Begins: search field to CN and then click the Search button.
Be careful! POI Names are different than POI IDs.
If you set the ID Begins: search field to the same thing, your results will differ.
If you want to edit the POI, click the POI ID link.
Creating POIs
You can create POIs one at a time using the interface, or you can import batches of POI data from a file. To import batches of POI data from a file, refer to the Importing POIs section.
To create a POI, you must provide an ID for the POI.
To begin creating a POI, enter an ID in the POI Id field on the main screen, and click the Create button to open the Create POI screen.
The Create POI screen looks like this:
On the Create POI screen, enter as much information as you can about the POI. You can use the following data fields to provide information:
Presentation Address
Name: Defines the name of the POI, for presentation purposes. The POI name does not have to be the same value as the POI ID that you specified when you clicked the Create button.Street: Defines the street of the POI, for presentation purposes.AltStreet: Defines an alternative street of the POI, for presentation purposes.City: Defines the city of the POI, for presentation purposes.Postal: Defines the zip/postal code of the POI, for presentation purposes.State/Prov: Defines the region code of the POI, for presentation purposes.Country: Defines the country code of the POI, for presentation purpose.
Additional Information
Telephone: Defines the telephone number of the POI.Manager: Defines the name of the manager of the POI.Franchisee: Defines the POI franchise name.Category: Defines the category of the POI.URL: Defines the website URL of the POI.Fax: Defines the fax number of the POI.email: Defines the email address of the POI.Hours: Defines the POI business hours.Logo URL: Defines the URL to the POI logo.Notes: Defines any custom notes or other important information about the POI.Warning Do not use abbreviations in this field because they may not be spoken as expected in applications such as NaviGo. For example, DR may be spoken as doctor instead of drive.
Directions: Defines any custom directions that can help people find the POI.
When you have finished entering the POI information, click the Save button. After you have saved the POI information, please read the Geocoding POIs section to learn how you can specify the actual location of your POI.
You can also perform a variety of Other Functions on the POI.
| Warning |
If you leave the screen without clicking Save, the POI will not be created. |
Editing POIs
If you know the full POI ID of the POI you want to edit, you can simply enter it in the POI ID field on the main screen and click Edit.
If the POI is found, the POI information is displayed on the edit screen.
If you do not know the full POI ID, please refer to the Searching for POIs section for more information. After performing a search, simply click the POI that you wish to edit.
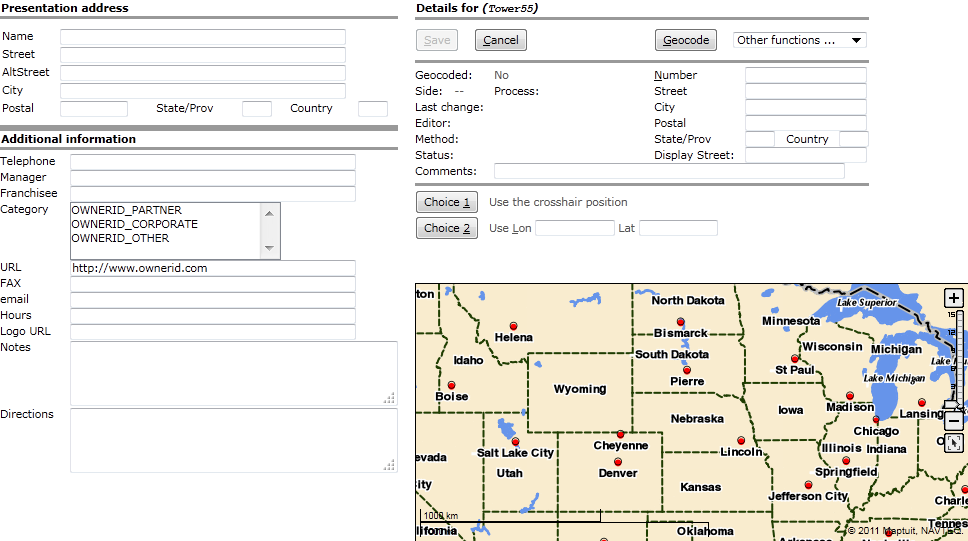
After you have selected a POI to edit, the following edit screen is displayed:
Are you wondering what the different circle and square icons mean? Learn more about the POI Editor icons by referring to the Icon Legend. Similar to the behavior of the icons, the information that appears in the information panel is displayed in green font if it is unsaved.
When the edit screen is first displayed, the Save button is initially disabled (greyed out). The button is disabled because no changes to the POI have been made. After you add or change information on the screen, the button is enabled to allow you to save the information. When you have finished making your changes, click Save.
To edit the POI, simply modify any information on the screen, such as the Presentation address or Additional information.
Refer to the Geocoding POIs section to learn how you can modify the (geocode) location of the POI.
You can also perform a variety of Other Functions on the POI.
| Warning |
If you leave the edit screen without clicking Save, your changes will be lost. |
Geocoding POIs and Other Functions
While you are creating or editing a POI, you can perform a variety of operations, such as:
Geocode: refers to finding or specifying the lon/lat point where the POI is located.
Other Functions: allows you to perform operations such as deleting a POI, reverting to the saved version, removing geocode information, configuring a yard for the POI, sending feedback, or setting the protection mode.
Geocoding POIs
Geocoding a POI refers to finding the lon/lat point where the POI is located.
You can geocode POIs during the creation process, or you can edit a POI to add the geocode information at a later time.
When you are at the create/edit screen, you either have two or three choices for geocoding the address:
Choice 1: GeoAddress - Geocodes using the specified geocode POI address (on the right hand side of the screen) which is usually automatically copied from the presentation address.
Note: An explanation will sometimes appear after the Choice 1 address. For example, the following text may appears beside Choice 1 after geocoding: 301 Front St W, Toronto, ON, M5V, CA (GeoAddess; House). The (GeoAddress; House) part is new, and provides an indication of the search method that was used to locate the address. In this case, the address was found to the House level (which is the most accurate).
If ?? appears after the search method (e.g. (AltStreet; House near intersection ??)), we recommend that you double check the location that was found to ensure it is correct. The ?? portion of the explanation indicates that the search result is potentially substandard.
Choice 2: Crosshairs - Geocodes using the clicked crosshair location on the map.
Choice 3: Lon/Lat - Geocodes using the specified
LonandLatcoordinates.
| Warning |
Sometimes there are only two choices available ( |
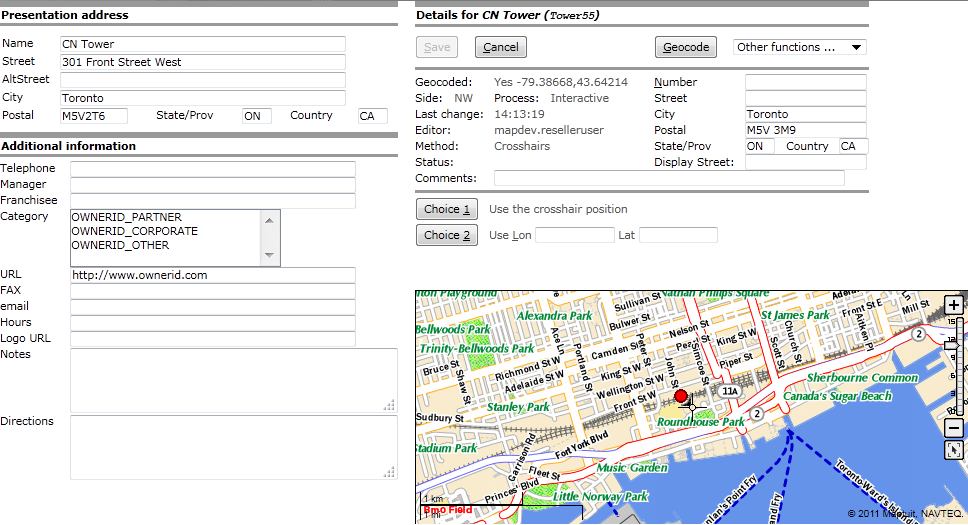
You can determine if a POI is geocoded by looking at the Geocode field.
If the POI has been geocoded, this field is set to Yes.
If the POI has not been geocoded, the field is set to No.
In the example below, the POI is saved but it is evident that there is no geocode information available because the Geocode field is set to No.
The POI information appears on the left, and the geocode information appears on the right hand side of the screen.
Updating the geocode information for a POI will not affect the presentation address or the additional information of the POI.
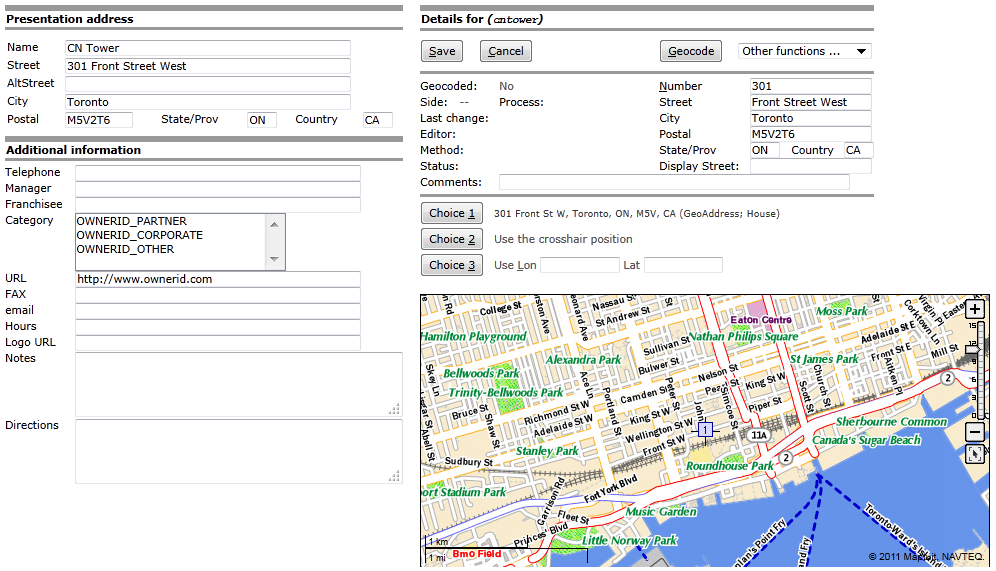
To geocode a POI, click the Geocode button.
POI Editor will attempt to geocode the specified geocode address.
The geocode address fields are (usually) automatically populated when you type the Presentation address of the POI.
You do, however, have the ability to specify a different geocode address for the POI.
After clicking the Geocode button, POI Editor attempts to find the lon/lat point of the address.
If the address is located, the address is displayed beside the Choice 1 geocode option button.
You will also see a blue square icon on the map at the location (blue square icons represent candidate locations).
If the location is correct, you can click the Choice 1 button to select the candidate address as the geocoded location.
At this point, the Method changes to GeoAddress and the map icon changes to either a green circle or green square icon, depending on whether or not the exact location (i.e. Side) is known.
After you save the location, the map icon becomes red.
Learn more about the POI Editor icons by referring to the Icon Legend
In our CN Tower example, the presentation address is not the actual location of the CN Tower. Therefore, Choice 1 is not the best option for this example. In this case, we need to correct the position of the POI.
In order to correct the position of the POI, you can click the map on the correct position, and then click Choice 2 to move the P OI indicator to that location. In the example below, the POI is displayed in the correct location.
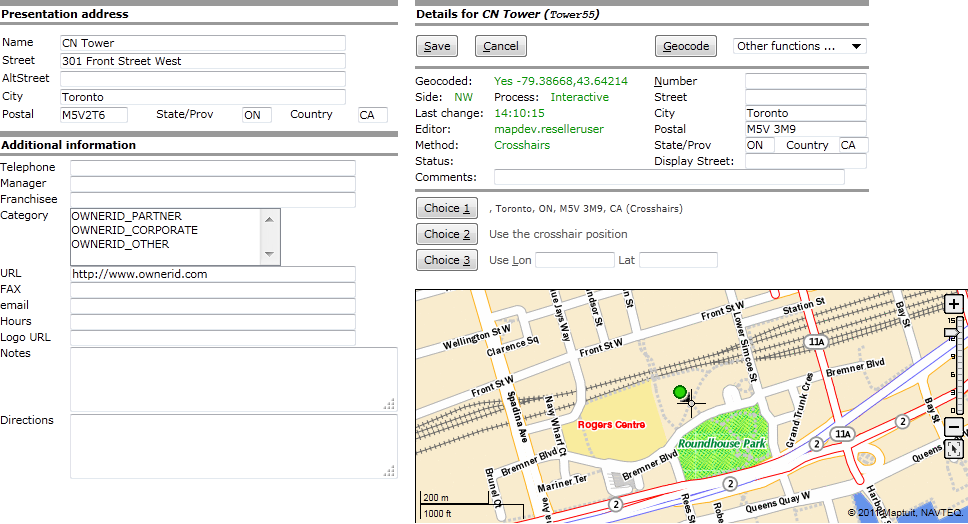
In the figure above, the geocode information appears in green font because it has not yet been saved.
The Method field has been set to Crosshairs because Choice 2 has been selected for the geocode method.
If you already knew the lon/lat point of the POI, you do not have to click on the map and choose Choice 2.
Instead, you can simply specify the coordinates in the Lon and Lat fields, and then click Choice 3.
In this case, the Method changes to Lon/Lat.
Geocode Field Descriptions
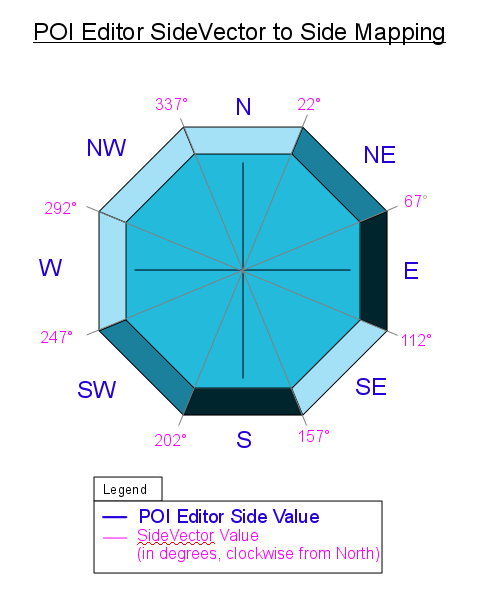
Geocoded: Indicates whether or not the POI is geocoded (YesorNo). If set toYes, the lon/lat point is displayed as well.Side: Provides information to determine what side of the road the POI is on, by providing the direction of the POI relative to the road network (e.g. N,NE,E,SE,S,SW,W,NW). For example, if the POI is located 20 degrees clockwise from north, then the Side value is set toNW. The diagram below outlines theSidevalues that are selected for variousSideVectorpossibilities:Process: Indicates the process that was used to last modify the POI (API,Interactive(POI Editor Web Application), orBatch)Last Change: Indicates the date the POI was last modified. This is set to a time if the POI was modified in the last 24 hours.Editor: Indicates the username of the last person who modified the POI.Method: Indicates the method that was used to geocode the POI (GeoAddress,Crosshairs, orLon/Lat)Status: Indicates the status of the POI.Comments: Indicates any comments that have been added to the POI.Number: Defines the house/building number of the POI geocode address.Street: Defines the street name of the POI geocode address.City: Defines the city of the POI geocode address.Postal: Defines the zip/postal code of the POI geocode address.State/Prov: Defines the region code of the POI geocode address.Country: Defines the country code of the POI geocode address.DisplayStreet: Defines the street name to use for display purposes.
POI Editor Icon Legend
Blue Square Icon with Number
The blue square icon indicates a candidate location. There can be multiple candidate locations displayed on a map. The icon displays a number so you can distinguish between multiple candidates.
Red Circle Icon (with arrow)
The red circle icon indicates that the POI location is saved. If the location information changes, the icon becomes green to indicate that it is no longer saved. The tip of the arrow points to the location on the road network that is used for the POI. The red circle is positioned so you can visually determine which side of the road the POI is located on. In this icon example, the actual POI location is slightly North West of the point (on the road network) that is stored for the POI.
Green Circle Icon (with arrow)
The green circle icon indicates that a location has been geocoded for the POI, but the location has not been saved. The tip of the arrow points to the location on the road network that is used for the POI. The green circle is positioned so you can visually determine which side of the road the POI is located on. In this icon example, the actual POI location is slightly North East of the point (on the road network) that is stored for the POI. After you save the POI, the green circle icon changes to a red circle icon.
Red Square Icon
The red square icon indicates that the POI location is saved. If the location changes, the icon becomes green. This icon means the same thing as the red circle icon, but the square shape (and absent arrow) indicates that the side of the road is unknown.
Green Square Icon
The green square icon indicates that a location has been geocoded for the POI, but the location has not been saved. This icon means the same thing as the green circle icon, but the square shape (and absent arrow) indicate that the side of the road is unknown.
Other Functions Menu
The Other functions... drop down allows you to perform a variety of operations:
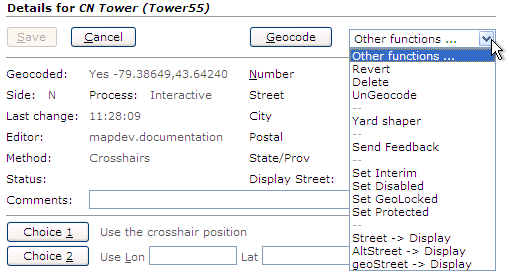
When you select a function from the Other functions... drop down list, the function is automatically performed immediately.
Some functions (e.g. Delete) require confirmation.
Here is the description of each operation that you can perform using the Other functions... drop down:
Revert: Allows you to undo the last operation. This operation does not work if you have already saved the POI. This operation cannot be used if you have deleted a POI.
Delete: Deletes the POI.
UnGeocode: Deletes the geocode information stored for the POI.
Yard Shaper: Allows you to associate a yard with a POI.
Send Feedback: Allows you to send feedback about the POI.
Set (or Clear) Interim: This option allows you to flag locations that should be revisited when data improves in the area. This flag should be set for locations for which it is currently necessary to position the location to an incorrect point because the actual location is not in the road network data. For instance, if a distribution center is located on Walmart Rd, but Walmart Rd is a newly constructed access road off US-421, and is not in our data, it might be appropriate to temporarily place the marker on US-412. In this case, the POI should be flagged as
Interim.If set, the POI presentation address is used to attempt to re-geocode the POI (when addresses are re-geocoded due to updates by the data provider). If this setting is enabled and no geocode address exists, the presentation address is used to re-geocode the POI (as if a new POI had been submitted). If this setting is NOT enabled, the existing geocode address is used to geocode the POI.
Set (or Clear) Disabled: If set, the POI becomes disabled and will not appear in POI searches. However, the POI can still be found and re-enabled when using the POI management services.
Set (or Clear) GeoLocked: This setting allows you to lock the geocode elements of the POI. After the POI is geoLocked, you can make changes to other POI elements without having to re-geocode the POI. For example, you may wish to set the geocoded location to a loading dock, which is different than the customer entrance of a store. This setting would allow you to change the presentation address or other elements, without re-geocoding the POI. If the POI is not GeoLocked, it would be re-geocoded using the presentation address, which would overwrite the location of the loading dock.
If set (enabled), the geocode elements of the POI become locked and will not be automatically re-geocoded. However, other POI elements (not related to geocoding) can be updated.
Set (or Clear) Protected: If set, all POI information (including geocode elements) are protected/locked and all updates to the POI are ignored.
Street -> Display: Sets the
Streetvalue as the displayed street for the POI.AltStreet -> Display: Sets the
AltStreetvalue as the displayed street for the POI.geoStreet -> Display: Sets the
geoStreetvalue as the displayed street for the POI.
Deleting POIs
You can delete a single POI, or perform a batch delete.
Deleting a Single POI
You can delete a single POI by navigating to the edit screen for the POI that you wish to delete.
On the edit screen, select Delete from the Other functions drop down menu.
POI Editor requires your confirmation prior to deleting a POI.
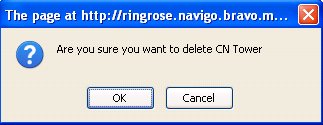
If you would like to delete the POI, click OK. Otherwise, click Cancel.
Deleting a Batch of POIs
| Warning |
If you click the Delete button when all search fields are blank, your search will match all POIs. If you confirm the deletion, your entire POI collection will be erased. |
You can delete a batch of APIs by completing the following steps:
On the main POI Editor page, complete the fields on the search form to match the POIs that you wish to delete. If, for some reason, you wish to delete all POIs, leave the search form blank.
Click the Delete button. After you click Delete, POI Editor pops up a new window that displays a list of all POIs that matched your search criteria.
Review the list of POIs that matched your search to ensure that you wish to delete the selected POIs.
The POIs are not deleted until after you click the Confirm Deletion button located in the new pop up window. If you wish to delete the POIs, click the Confirm Deletion button.
Yard Shaper
The Yard Shaper feature allows a fleet to associate a geofence (i.e. yard) with a POI. The yard information can then be captured and used for arrival, departure and association scenarios. For example, if a yard is defined for the POI, a nearby road will not be selected for the route starting point if the driver requests a route while located inside the yard. Instead, the routing services will use the defined yard exit point as the starting point for routes generated while located inside the yard boundaries.
Background: Prior to the introduction of the yard shaper feature, sometimes the wrong road would be selected as the route starting point when a driver requested a route while positioned inside the yard. For example, this issue would sometimes happen if a truck was located at the back of the yard near another road. When the route was requested, the road (outside of the yard) would be selected as the route starting point even though the truck was unable to access the road directly from the yard.
You can access yard shaper by selecting the Yard Shaper option from the Other functions... drop down list while creating or editing a POI.
The Yard Shaper screen automatically loads.
When you view a POI (with an associated yard) in POI editor, the yard is displayed on the map as a thin blue line. After you launch the yard shaper feature, the map zooms in and displays the yard shaded yard on the map.
Yard Shaper looks like this:
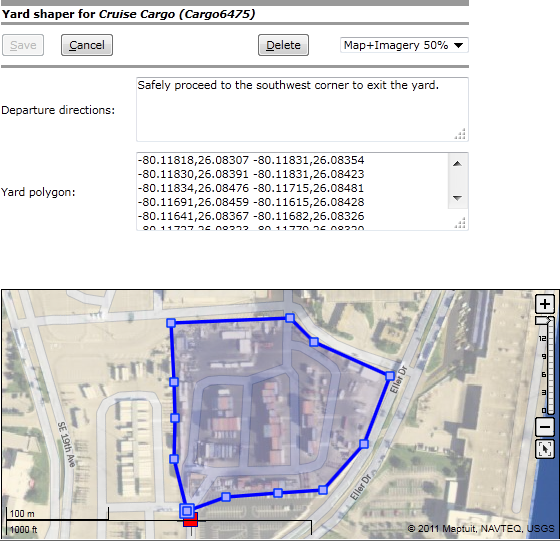
Yard Shaper consists of the following components/features:
Map Imagery Transparency Option:
Allows you to select the level of map imagery transparency. Map imagery is extremely helpful for identifying the actual boundaries of the yard.
Allows you to delete the yard currently associated with the POI.
Departure directions:
This text field allows you to specify textual directions about how to exit the yard. These directions are passed to NaviGo and handled as extra directions.
Yard polygon:
This text field defines the shape of the yard using lon,lat points (separated by spaces). This field is automatically populated when you click the map to draw yard points.
Tip: The
Yard polygonfield allows you to copy and paste the shape to use as a yard for a different POI. This is extremely useful if you have multiple POIs at the same location. Instead of redrawing the shape for each POI, you can copy and paste the Lon,Lat points.Warning: The
Yard polygonfield treats Lon,Lat points as absolute (not relative). Therefore, you cannot reuse (i.e. copy and paste) a shape for a POI at a different location.Interactive Map with yard drawing capabilities:
Provides you with the ability to create, modify, and erase yard shapes using an interactive map. Left-click the map to add a yard shape point, or right-click the map to view a menu of options.
Selecting the Map Imagery Transparency
Note: Imagery is currently only available for USA locations.
The map in yard shaper has the ability to display imagery data at various levels of transparency:
Map, no imagery: The standard map is displayed, without imagery.Map+Imagery 25%: The map is displayed with 25% imagery.Map+Imagery 50%: The map is displayed with 50% imagery.Map+Imagery 75%: The map is displayed with 75% imagery.Imagery only: The map is displayed with imagery only.Note: If you select this option, the map is displayed using 100% imagery. In this mode, road information is not displayed on the map.
Here are examples of each imagery option:
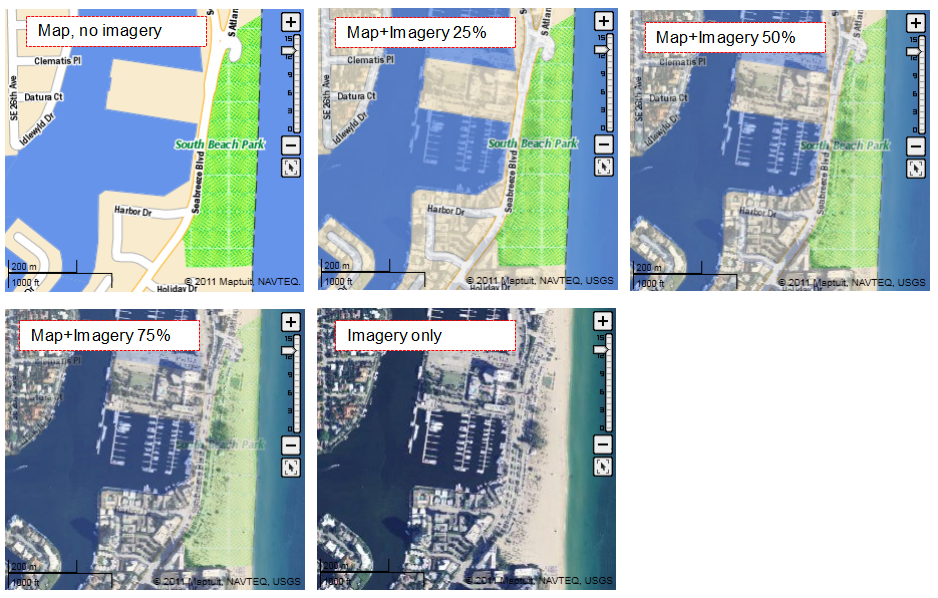
When you select a map imagery transparency option, the setting is preserved between sessions. Therefore, when you open a yard in a different POI, the same level of map imagery transparency is used for displaying the maps.
Deleting a Yard
To delete a yard that is associated with a POI, simply click the Delete button while you are in yard shaper mode. After you click the Delete button, the yard is automatically deleted and yard shaper mode is automatically closed.
Note: Be careful when deleting yards. There is no confirmation required when you click the Delete button.
Creating / Modifying Yards using Interactive Map
The Yard Shaper feature allows you to define a yard by drawing a polygon on the map. Map imagery is provided to help you define the boundaries of the yard as accurately as possible. For more information on map imagery, read more about selecting the map imagery transparency.
Creating a Yard
Currently, you can associate one yard with each POI. If the POI already has a yard associated with it, and you would like to replace the existing yard with a new yard, read more about deleting yards.
After you have launched yard shaper, you can begin drawing your yard by clicking the map at the yard exit point. A blue icon will appear on the map at the location that you clicked.
Important: Currently, a yard can have only one exit point. The first point of the polygon on the map is used for the yard exit point. The exit point is marked with a larger blue square icon than the other polygon points. However, you can only view this exit point when you are in yard shaper mode.
Proceed with drawing the polygon by clicking another location on the map to draw a line. Continue drawing the polygon by clicking on the map at the boundaries of the yard. While drawing a point, you can right-click the map to access a variety of options:
Drop point & continue: This action adds a point to the current mouse position.Tip: The same behavior can be achieved by left-clicking the location on the map.
End shape: This action attempts to end the shape at the current position. If the shape is incomplete, an error is reported.Cancel continue: This action stops the shape drawing process. To continue drawing the shape, simply left-click the last drawn point of the shape.
Completing the Shape
To complete the yard, you must first close the shape. If you hover over the first point while drawing the polygon, a tooltip is displayed that says Close polygon. Simply left-click while hovering directly over the first polygon point, and the polygon shape is completed. After the polygon shape is complete, the yard is shaded lightly in blue.
Note: If you attempt to end a shape that is not closed, the following error is displayed above the map:
Polygon is incomplete.
You can continue drawing an incomplete shape at any time by left-clicking the last shape.
After (or during) yard creation, you may wish to modify the yard using a variety of modification features.
Modifying a Yard
Yard Shaper offers various tooltips and extra features that can help you modify or improve a yard:
Add a Point
Sometimes you may want to add additional points to a polygon shape in order to improve the accuracy of the yard boundaries.
To add a point to the polygon, you can use one of the following methods:
Simply left-click the polygon line between the two points where you would like the new point added. A new point is immediately added, allowing you to move the new point to the desired location. Simply click the left mouse button at the appropriate location for the new point.
Right-click the line where you want the new point added, and then select Insert point from the options menu. The new point is added at the location on the line that you right-clicked. You can easily move the point to a new location.
Move a Point
When you hover on a point, a tooltip is displayed that says Move Point. You can begin moving the point by clicking the point with the left mouse button, or by right-clicking the point followed by selecting the Move point option from the menu. Then, move your mouse to the location where the next shaping point should be added. When you have stopped moving your mouse, a tooltip is displayed that says End Move. Click the left mouse button to finish moving the point.
While moving a point, you can right-click the map to access a variety of options:
Drop point & continue: This action adds a point to the current mouse position.Tip: The same behavior can be achieved by left-clicking the location on the map.
End shape: This action attempts to end the shape at the current position. If the shape is incomplete, an error is reported.Cancel continue: This action stops the shape drawing process. To continue drawing the shape, simply left-click the last drawn point of the shape.
Delete a Point
You can delete a point by right-clicking the point to display the menu. Click the Delete point option from the menu. The point is deleted immediately. No confirmation is required.
Delete a Line
Note: You can only delete a line if the polygon is complete (i.e. the yard is shaded in a light blue color). If you would like to delete a line that is part of an incomplete yard, you can do so by deleting a point instead.
You can delete a line of a complete polygon by right-clicking the line to display the menu. Click the Delete line option from the menu. The line is deleted immediately. No confirmation is required.
Mark start point
You can mark a point as the starting point. The polygon starting point is used for the Yard exit point.
To mark a point as the starting point (i.e. change the yard exit point), simply right-click the point that you want to become the new starting point. Next, click the Mark start point option from the menu.
The point is marked with the larger blue square icon, which means the point is the exit point for the yard.
Undo
Yard shaper maintains a full history of actions, allowing you to undo any number of yard shaper changes.
To undo the last change, simply right-click the map and select Undo from the menu.
Redo
Yard shaper maintains a full history of actions, allowing you to redo any number of undone changes.
To redo the last undone change, simply right-click the map and select Redo from the menu.
Note: The Redo option only appears in the menu if you have used the Undo option.
Revert
You can revert to the saved yard at any time. The saved yard means the yard that was defined the last time the yard shaper Save button was clicked.
To revert to the saved yard, simply right-click the map and select Revert from the menu.
Erase Entire Shape
Erasing an entire shape can be useful if you would like to start over. Erasing a shape is similar to deleting a shape, but the erase function will not exit yard shaper mode. Also, the erase feature will not permanently delete the yard. After erasing a yard, you can still Revert to the last saved yard.
To erase an entire shape, simply right-click the map and select the Erase entire shape option from the menu.
Fit Entire Shape
Yard shaper offers you an easy way to recenter and zoom and map so the entire shape is displayed. Simply right-click the map and select the Fit Entire Shape option from the menu.
Note: You may be unable to see the POI on the map after selecting the Fit Entire Shape option. This can happen if the POI location is located some distance from the yard. You can zoom out to view a larger area until you see the POI on the map.
Importing POIs
| Warning |
Any information that you import into POI Editor will overwrite any POI information that already exists. Therefore, if you have locations that have been manually geocoded, those will fall back to an ungeocoded state. We recommend that you first Export any locations that you do want overwritten, prior to importing additional customer locations. |
In many cases, we recommend that you first export any POI locations that you do want overwritten, prior to importing additional customer POI locations. Exporting first can be a way of preserving geocode data. Alternatively, you may import only a subset of column data. Re-importing a record for an existing code only overwrites the data columns in the update file. If the records are geocoded and you don't upload new address data or geo data (lat/long values), POI Editor will not change the geocodes. For example, for existing locations, you can upload customer notes or directions in an update file with just three columns (id,name,CustomDirections). Now, we'll explain what the import and export files look like.
Note: POI Yard information is currently not included in the export file.
In order to import batches of POI data, the data must be properly formatted in a file. The POI Editor accepts the following file formats:
Excel 95/97/2000 for Windows spreadsheets
Tab, Pipe, or Comma delimited text, in the ISO-8859-1 character set
Regardless of the file format, the first row of your import file must be a header row denoting the order of the data fields in subsequent rows. For Excel files, each sheet in the file is read in order (only the first sheet should have a header row). The remaining sheets must be in the same format.
The following table outlines the fields that MUST exist in your POI data import file:
Table 2. Required Fields
| Field Name | Description | Maximum length |
|---|---|---|
| id | Your unique identifier for the POI | 32 |
| name | The name of this POI (REQUIRED) | 128 |
The following table outlines the fields that are OPTIONAL in your POI data import file:
Table 3. Optional Fields
| Field Name | Description | Maximum length |
|---|---|---|
| street | Street address | 256 |
| altstreet | Alternative street address | 256 |
| city | City/Town | 256 |
| region | 2 or 3 letter code for the state, province, or region | 3 |
| country | ISO standard country code | 2 |
| postal | ZIP or other postal code | 12 |
| longitude | Pre-geocoded longitude | Must be a valid longitude coordinate. |
| latitude | Pre-geocoded latitude | Must be a valid latitude coordinate. |
| scalelimit | Highest scale at which this POI is drawn on a map, default 20 | value up to 5000 |
| telephone | Phone number | 256 |
| telephonetwo | Alternate phone number | 256 |
| fax | Fax number | 256 |
| hours | Operating / Store Hours | 256 |
E-Mail Address | 256 | |
| url | URL to POI website / details | 65536 |
| logourl | URL to logo image | 65536 |
| keywords | Whitespace-separated list of keywords | 65536 (total) |
| notes | General notes about this POI | 65536 |
| class | Class value for this POI, for ActiveLayers integration | value from -32767 to 32767 |
| description | Description of this POI | 65536 |
| priority | The priority level. | integer |
| directions | Custom direction text | 65536 |
| displaystreet | Street address to display instead of geocoded address | 256 |
| Custom Fields | Custom fields may be specified by using a column header in the form "Custom_[keyname]", where [keyname] is the name of the custom field being stored. | 65536 (for all custom data, including keys and values) |
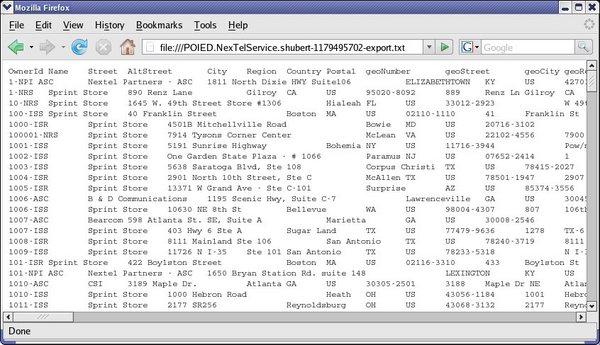
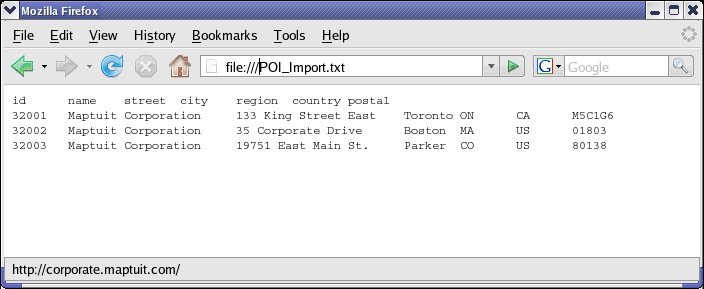
Below is an example of a properly formatted input file. The file contains the 2 required fields (id,name) as well as 5 optional fields (street,city,region,country,postal).
After you have finished creating your import file, click Import on the main screen of the POI Editor to begin the import process.
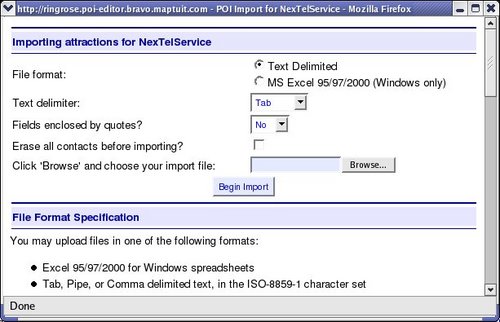
On the import screen, you must specify the format of your import file, and then click Browse to locate the file that contains the POI data that you wish to import. Click Begin Import to begin the process of importing your POI data.
| Warning |
The connection must remain open while the data is being imported. Therefore, it is recommended that you do not import extremely large batches of data. It is recommended that you import data in smaller batches, or use the API to import your data. You can also contact your customer support representative for assistance. |
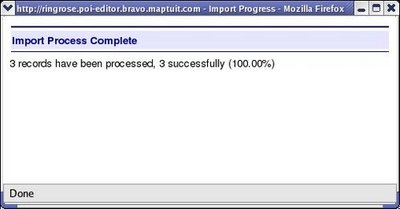
The POI Editor reads your input file, and notifies you if there is an error with the format of your file. If your input file is properly formatted and the import is successful, the following screen is displayed:
Exporting POIs
You can export your POI data to a tab-separated .txt file. You can either export all POI data, or you can specify search criteria to export the data that you need.
Note: POI Yard information is currently not included in the export file.
To export all POI data, leave the search fields blank and click Export. To export only a portion of the POI data, specify search criteria in the fields and click Export.
The POI Editor searches for the POI entries that meet your criteria, and creates a tab-separated .txt file that contains your data. The screen displays the number of records that were found, and provides a DOWNLOAD EXPORT RESULTS link for you to download your export results.
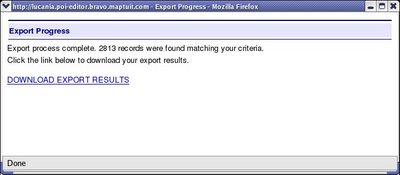
To download the file, click the DOWNLOAD EXPORT RESULTS link and save the file. The exported data is contained in a .txt file. An example is shown in the screenshot below: