Creating New Modifiers
Note: Prior to creating a new modifier, it is a good idea to perform a search to ensure that a duplicate modifier does not already exist.
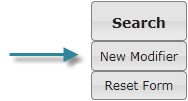
You can access the New Modifier page by clicking the New Modifier link located on the Search tab:
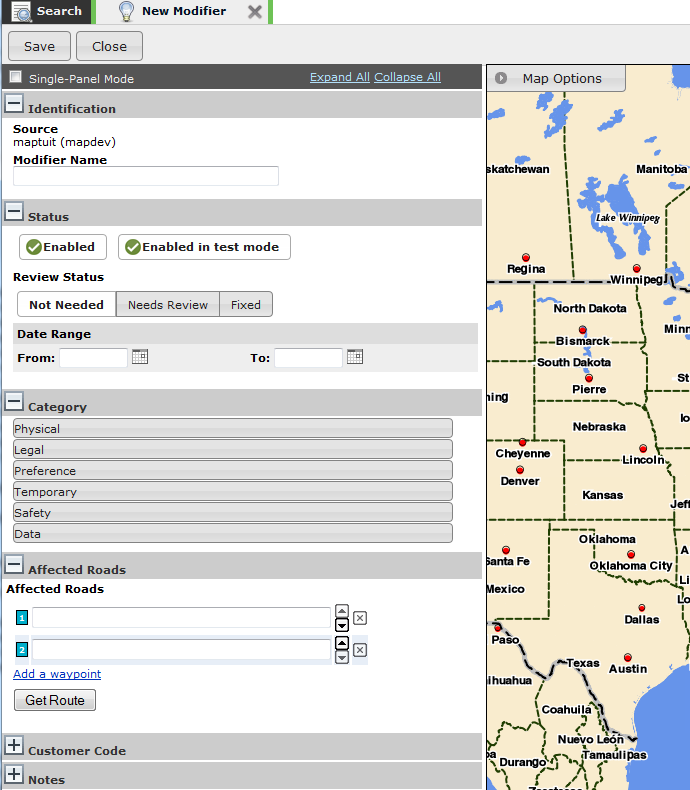
The New Modifier page looks like this:
To create a new modifier, specify all of the modifier details and then click the Save button. To cancel the new modifier, click the Close button.
Information about the modifier details panels are outlined below.
New Modifier Page Overview
When the New Modifier page appears, information panels appear on the left hand side, and a map is displayed on the right hand side of the screen. For more information about the map capabilities, refer to the Map Options section.
Each information panel contains required and optional road modifier information fields. The following panels contain required fields and are automatically open when you view the screen:
IdentificationStatusCategoryAffected Roads
You can view or hide the panels by clicking on the + and - icons displayed on the left hand side of the panel titles.
To view all panels, click the Expand All link.
To hide all panels, click the Collapse All link.
You can also place a checkmark in the Single-Panel Mode option if you prefer to view only one panel at a time.
Identification Panel
Source: This field is completed for you automatically and cannot be changed. While viewing modifiers on a map, you can display or hide modifiers from different sources (e.g. NavTeq, Maptuit, yourSource).Modifier Name: Type the new modifier name into theModifier Namefield.Note: This field is required. A modifier name must be specified before you can save a modifier.
Status Panel
Modifier Status
Indicates whether a modifier is enabled or disabled. Disabled modifiers will have no impact on routing.
Click the button to toggle between
EnabledandDisabledfor the Modifier Status.Note: If at least one of the
FromorTodates are set, the '(via date range)' text is displayed beside the modifier status control. When this happens, the modifier status cannot be changed manually.Test Mode Status
Indicates whether a modifier is enabled or disabled in test mode. You can then experiment with routes in Route Generator using test mode modifiers (without impacting routing in production).
Click the button to toggle between
Enabled in test modeandDisabled in test modefor the Test Mode Status.Note: The test mode feature/option is not available by default. Therefore, you may not see this option on your screen. To enable this feature, contact your customer support representative.
Review Status
The
Review Statusfield is an informational field that provides information about whether or not a modifier requires review.The following status options can be assigned to a modifier:
Not Needed: Indicates that the modifier does not require review.Needs Review: Indicates that the modifier requires review.Fixed: Generally indicates that a modifier was reviewed and then fixed.
Date Range
The date range feature allows you to configure Road Manager to automatically enable and/or disable a modifier based on the specified date range. If both the
FromandTodates are set, the modifier is automatically enabled on theFromdate and then disabled on theTodate. The automatic status changes will occur prior to start of business on the specified day.From: Indicates that the modifier should become enabled automatically on the specified date. If only theFromdate is set, the modifier is automatically enabled on theFromdate and remains enabled.To: Indicates that the modifier should become disabled automatically on the specified date. If only theTodate is set, the modifier is automatically disabled on theTodate and remains disabled.Would you like to be reminded via email?: Indicates whether or not you wish to receive an email reminder whenever a modifier is automatically enabled or disabled. To receive an email reminder, simply selectYesand then type your email address into the space provided. You can specify a single email address, or specify multiple email addresses by separating the addresses with a comma. Email reminders are sent immediately after the status of the modifier is automatically changed by Road Manager.Note: This option only appears in the panel if you have specified a date for at least one of the
FromorTofields.
Category Panel
Note: This field is required. A category must be selected before you can save a modifier.
To select a category, simply click the category group to expand the list of categories. Then, choose a category by clicking the appropriate option.
For more information about road modifier categories, refer to the Modifier Categories section.
Affected Roads Panel
Note: This field is required. You must generate a route successfully before you can save a modifier.
To specify the affected roads, perform the following steps:
Specify a start address using one of the following methods:
Type an address into the first field.
Refer to the Finding Locations section for more information about acceptable inputs for specifying an address.
Note: When you use a POI to specify the location of a road modifier, you must put an @ symbol ahead of the POI ID if the ID begins with one or more spaces.
Click a location on the map and select the Route starts here link.
Specify an end address using one of the following methods:
Type an address into the second field.
Refer to the Finding Locations section for more information about acceptable inputs for specifying an address.
Click a location on the map and select the Route ends here link.
[Optional] Add a way point using one of the following methods:
Click the Add a Way Point link and then type the address into the new field
Click a location on the map and select the Add waypoint here link.
Click the Get Route button to get the route.
Finally, review the generated route to ensure that the affected roads are correct. If the affected roads are not correct, you can change the shape of the route by clicking a location on the map and selecting the Add way point here link. After adding a way point, you must click the Get Route button to generate the route with the new way point.
You can change the order of points by using the up and down arrow icons located beside each point. You can remove points by clicking the X icon located beside each point.
Important: Always click the Get Route button and review the affected roads route after making any changes to the routing points.
A route must be generated successfully in order to save a modifier.
Affected Road Warnings
Road Manager provides warnings to help you create more efficient road modifiers.
Long Modifier Warning
If you attempt to create a road modifier that is longer than 10km (6.2 mi), Road Manager will display a warning message.
Note: Please contact your customer support representative to configure a different distance value for this feature.
Overlapping Modifier Warning
If you attempt to create a road modifier that overlaps with an existing modifier, Road Manager will display a warning message. This feature can help you prevent the creation of duplicate modifiers.
Customer Code Panel
The Customer Code panel allows you to associate POIs with a road modifier.
Note: If you select a
Preferred approach to locationpreference for a road modifier, you must associate the modifier with a POI.
The customer codes must be specified in the appropriate customer code format (e.g. @maptuit).
| Warning |
If you specify a customer code, the road modifier will only apply to routes that travel to that customer/POI location. |
You can add additional customer codes by clicking the Add another location link. To delete a location, simply click the X icon located beside the location that you wish to delete.
If you associate a customer code (POI ID) with a modifier, the customer location(s) are marked on the map with a yellow star icon. You can easily view the location of customer codes by clicking the Map link located to the right hand side of each customer code in the Customer Code panel. You can also view a list of nearby customer locations by clicking on the map.
Notes Panel
Modifier Notes: Indicates any additional information about the modifier.System Notes: This field contains system messages associated with the modifier. This field is intended to be used for notes generated during modifier migration.Note: This field cannot be edited.